
Introduction to R for Data Science (Part Four)
This is the fourth introduction to R. This will cover functions, while loops, for loops, built-in features, and more.

PS: Please read ‘Introduction to R for Data Science (Part Three)’ before reading this one. This is a continued version of part three.
Part three: Introduction to R for Data Science (Part Three)
If, else, and else if Statements
The logic behind the if, else, and else if statement is the same among other programming languages. The syntax is different.

NOTE: You can’t use the console when writing if, else, and else if statements. You have to use the R script.
15 equals the if statements, so it printed out ‘x is equal to 15!’
If it was 11 it would print out the else-if statement, ‘x is equal to 11’

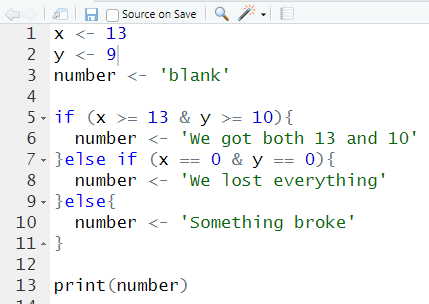
13 doesn’t equal 15 or 11, so it displays the else condition.
You want to write out the if statement first, then else if statement, and last the else statement. If 13 doesn’t equal 15, it will go to the else if statement. If 13 doesn’t equal 11, it will go to the else statement. This would be your last statement and you would want to write a condition when everything fails. That is why you don’t want to write else (x == 10). It wouldn’t work anyways.
If you want more conditions, you can add more else-if statements.
Here is an example that you can write on your R script. Play around with it and see if you can understand it.
While Loops
While loops will let our program run basically forever until a condition is met.
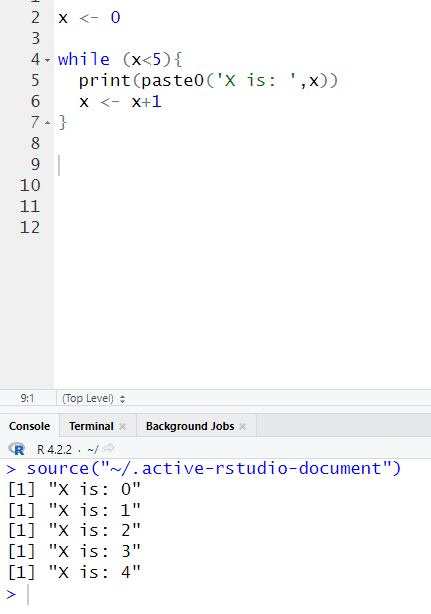
In this example, x would continue on running until conditions are met. X has run until four since four is the last digit less than five.

You can add an if statement on a while loop.
Use a break statement if you just want to break out of the loop. This would stop the looping.
For Loops
For loops will allow us to iterate over an object to perform and execute codes for every loop we go through.

The difference between a for loop and a while loop is that for a for loop, you’re going to execute code for every eeexxx. It’s going to be every variable inside eeexxx. Note that it doesn’t have to be called eeexxx. You can name it however you want. In this case, the output is 1,2,3,4 since there are 1,2,3,4 in the vector.

Here is another example. I have just added two to each vector number.
Functions
Functions are building blocks for when we’re constructing large amounts of code. Functions would group together a set of statements so they can be run multiple times.

This is the basis of a function. We can name it whatever we want (I just named it ‘name’). Then we would use the function statements with parenthesis and brackets. Then we would write a code that we want to execute, so in this case, I want the console to print out ‘Name’, but in order to do this we have to call the function. This is where you want to write your name and put a parenthesis after it, so I write ‘name’ again with a parenthesis at the end. This would allow the console to generate the output ‘Name’.

In this example, we have ‘name’ as our name, the function keyword, the ‘Name’ that we have passed as an argument or parameter into the function(you can name it however you want), the paste function, and the name(‘David Yeager’). We must have name(‘David Yeager’), we can’t just put name(), we have to put a name inside the parenthesis since we have function(Name).

Here is another example that you can play around with.

We don’t want to use print() all the time. We would want to use return(). The return will let us assign the result to a variable. When I run this source, nine doesn’t appear in the output because we aren’t printing nine out. I’m just storing it as a variable result. You can see nine on the right listed under ‘Values’.

If we want to see the results, we can just write print(result). We can print out the results many times.
Advanced
Features of R
Basic features we’re going to work on:
seq()
sort()
rev()
str()
append()

seq() will allow us to create sequences. In this example, we have a starting point of 0 and an endpoint of 100. The by=2 is jumping by 2 as you can see. I have also included another example to make things easier to understand.
sort() will allow us to sort a vector. In this case, I have sorted from least to greatest. If you want to sort from greatest to least use decreasing = TRUE. It can also sort by alphabetical order.
rev() will allow us to reverse an object. In this case, I have reversed 1:5 from greatest to least.
str() will just show the structure of an object.
append() will allow us to merge objects together (will work on lists and vectors). In this case, I have merged a and b together which resulted in 1, 7, 3, 8, etc.
We can also check/convert data type by using:
is.
as.
The is. method is for checking the data type. The as. method is for converting the data type.
[End of Part Four]