

File Input
<input>
type=”file”
This would create a Choose File button (safari on Mac may be labeled differently). When users click on it, a window will open telling them to select a file from their computer.
<!DOCTYPE html>
<html>
    <head>
        <title>Tile of the Page</title>
        <link rel="stylesheet" href="style.css">
    </head>
    <body>
        <form action="" method="">
            <p>Upload a file: </p>
                <input type="file" name="file">
        </form>
    </body>
</html>
Submit Button
<input>
type=”submit”
This is used to send a form to the server.
name
You can use a name attribute if you want.
value
This is used to control the text that appears on the button.
<!DOCTYPE html>
<html>
    <head>
        <title>Tile of the Page</title>
        <link rel="stylesheet" href="style.css">
    </head>
    <body>
        <form action="" method="">
            <p>Upload a file: </p>
                <input type="file" name="file">
                <br>
                <input type="submit" name="upload" value="Upload">
        </form>
    </body>
</html>

Image Button
<input>
type=”image”
If you want to use an image for the submit button, you can give the type attribute a value of an image (I used a random image for this).
<!DOCTYPE html>
<html>
    <head>
        <title>Tile of the Page</title>
        <link rel="stylesheet" href="style.css">
    </head>
    <body>
        <form action="" method="">
            <p>Upload a file: </p>
            <input type="file" name="file">
            <br>
            <input type="image" src="images/Untapped 1.png" width="100" height="25">
        </form>
    </body>
</html>
Buttons
<button>
This would allow users more control over how their buttons appear. This means you can combine text and images between <button> and closing </button>. It basically allows you to customize the button (My image becomes the button).
<input>
type=”hidden”
These are not shown on the page. They allow web developers to add values to forms that users cannot see.
<!DOCTYPE html>
<html>
    <head>
        <title>Tile of the Page</title>
        <link rel="stylesheet" href="style.css">
    </head>
    <body>
        <form action="" method="">
            <button>
                <img src="images/Untapped 3.png" alt="button">
            </button>
            <input type="hidden" name="mark" value="number">
        </form>
    </body>
</html>
Labelling Controls
<label>
This element can be used in two ways:
Wrap around both a text description and form input
Be kept separate from form control and use for attribute to indicate which form control it is a label for.
for
This states which form of control the label belongs to. The value for the for attribute should match the id attribute on the form control.
<!DOCTYPE html>
<html>
    <head>
        <title>Tile of the Page</title>
        <link rel="stylesheet" href="style.css">
    </head>
    <body>
        <form action="" method="">
           <label>Name:</label> <input type="text" name="name">
            <br>
            <input type="password" name="password" id="pppass">
            <label for="pppass">Password</label>
        </form>
    </body>
</html>
Grouping Form Elements
<fieldset>
You can group related form control inside <fieldset>.
<legend>
This contains a caption that helps identify the purpose of that group of forms.
<!DOCTYPE html>
<html>
    <head>
        <title>Tile of the Page</title>
        <link rel="stylesheet" href="style.css">
    </head>
    <body>
        <fieldset>
            <legend>Contacts</legend>
            <label for="">Name:</label>
            <input type="text" name="name">
            <br>
            <label for="">Password:</label>
            <input type="password" name="password">
            <br>
            <label for="">Phone Number::</label>
            <input type="text" name="phone">
        </fieldset>
    </body>
</html>
Form Validation
This gives users messages if the form control hasn’t been filled in correctly. This helps ensure the user enters information that the server can understand when the form is submitted.
<!DOCTYPE html>
<html>
    <head>
        <title>Tile of the Page</title>
        <link rel="stylesheet" href="style.css">
    </head>
    <body>
        <form action="" method="">
            <label for="">Name:</label>
            <input type="text" name="name" required>
            <br>
            <label for="">Password:</label>
            <input type="password" name="password">
            <br>
            <input type="submit" value="Submit">
        </form>
    </body>
</html>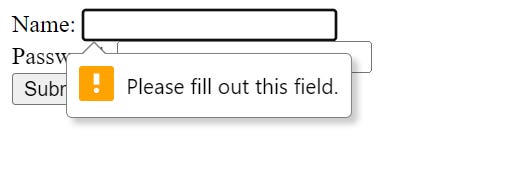
Date Input
<input>
type=”date”
This will create a date input.
<!DOCTYPE html>
<html>
    <head>
        <title>Tile of the Page</title>
        <link rel="stylesheet" href="style.css">
    </head>
    <body>
        <form action="" method="">
            <label for="">Today's Date:</label>
            <input type="date" name="date" required>
            <input type="submit" value="Submit">
        </form>
    </body>
</html>
Email Input
<input>
type=”email”
You can use the email input if you are asking the user for an email address.HTML validation will check if the user has provided the correct information in the correct format of an email address.
<!DOCTYPE html>
<html>
    <head>
        <title>Tile of the Page</title>
        <link rel="stylesheet" href="style.css">
    </head>
    <body>
        <form action="" method="">
            <label for="">Email:</label>
            <input type="email" name="email" required>
            <input type="submit" value="Submit">
        </form>
    </body>
</html>
URL Input
<input>
type=”url”
This can be used when asking a user for a web page address. HTML validation will check if the user has provided the correct information in the correct format of an URL
<!DOCTYPE html>
<html>
    <head>
        <title>Tile of the Page</title>
        <link rel="stylesheet" href="style.css">
    </head>
    <body>
        <form action="" method="">
            <label for="">Enter Web Address:</label>
            <input type="url" name="url" required>
            <input type="submit" value="Submit">
        </form>
    </body>
</html>
Search Input
<input>
type=”search”
If you want to create a text box or search queries you can use “search”.
placeholder
You use this value to show text inside the text box until the user clicks in that area.
<!DOCTYPE html>
<html>
    <head>
        <title>Tile of the Page</title>
        <link rel="stylesheet" href="style.css">
    </head>
    <body>
        <form action="" method="">
            <p>Search:</p>
            <input type="search" name="search" placeholder="Enter">
            <input type="submit" value="Search">
        </form>
    </body>
</html>
Markup
Doctypes
Each web page should begin with a DOCTYPE declaration to tell a browser which version of HTML the page is using.
Comments in HTML
<!-- –>
If you want to add comment to your code you can add text between these characters:
<!-- comments –>
They won’t be visible to users in the main browser window, they can be viewed by anyone who looks at the source code though.
<!DOCTYPE html>
<html>
    <head>
        <title>Tile of the Page</title>
        <link rel="stylesheet" href="style.css">
    </head>
    <body>
        <form action="" method="">
<!--Commenting on this post-->
            <p>Search:</p>
            <input type="search" name="search" placeholder="Enter">
            <input type="submit" value="Search">
        </form>
    </body>
</html>
Id Attribute
This is used to uniquely identify that element from other elements on the page. It should start with a letter and not a number. It is important that no two elements have the same id attribute on the same page.
This would be used for CSS and Javascript.
Class Attribute
HTML elements can also carry a class attribute. This is used for identifying several elements rather than uniquely identifying one element.
The class attribute can share the same value.
Grouping Text & Elements
<div>
This allows you to group a set of elements together.
For example, you might create a <div> to contain all the headers for your site. You can use an id or class attribute on the element.
This makes no difference to the presentation of the page.
This is useful for CSS and makes your code easier to follow.
<!DOCTYPE html>
<html>
    <head>
        <title>Tile of the Page</title>
        <link rel="stylesheet" href="style.css">
    </head>
    <body>
        <div id="header">
            <h1>Header</h1>
            <h2>header</h2>
            <h2>header</h2>
        </div>
    </body>
</html>
Grouping Text & Elements Inline
<span>
This is similar to <div> but is mostly used inline such as:
Containing a section of text
Contain a number of inline elements
You can use id or class attribute on <span>.
This is most commonly used to control the appearance of the content using CSS.
<!DOCTYPE html>
<html>
    <head>
        <title>Tile of the Page</title>
        <link rel="stylesheet" href="style.css">
    </head>
    <body>
        <p>A bunch of things, <span class="things">a bunch of things,</span> a bunch of things</p>
    </body>
</html>
IFrames
<iframe>
This is a little window that has been cut into your page. It is commonly used to embed Google Maps into a page.
src
Used to specify the URL or image (in my case) to show in the frame.
height
Height of the iframe in pixels.
width
Width of the iframe in pixels.
frameborder
Indicates whether the frame should have a border. A value of 0 indicates that no border should be shown and a value of 1 indicates a border should be shown
<!DOCTYPE html>
<html>
    <head>
        <title>Tile of the Page</title>
        <link rel="stylesheet" href="style.css">
    </head>
    <body>
        <iframe src="images/Untapped 3.png" height="400" width="400"></iframe>
    </body>
</html>
Information about Page
<meta>
This lives inside the <head> element and contains information bout that web page. It is not visible to users but it helps fulfill a number of purposes such as telling search engines about your page, who created it, if it should be time-sensitive, and more.
description
This contains a description of the page. Commonly used by search engines to understand what the page is about.
keywords
This contains a list of comma-separated words a user might search on to find the page. This is no longer affects how search engines index your site.
charset
Helps the character encoding
http-equiv
Provides HTTP header
Escape Characters
These are special codes that can be used to show symbols such as trademarks, copyright, math characters, and more.
Here is a link to see all the escape characters:
https://mateam.net/html-escape-characters/
[End]