
HTML Essentials: A Beginner's Guide to Web Development (Part Two)
Building websites

Images
Images can be used to set the tone of the web page.
Images should
Be relevant
Convey information
Convey the right mood
Be recognizable
Fit the color palette
It is good practice to store all your images in a folder. This would help keep it organized.
Adding Images
<img>
You would use <img> to add an image to the page. It has two attributes:
src: This tells the browser where it can find the image file.
alt: This provides a text description of the image. It should be accurate so it can be understood by a screen reader (for people with visual impairments).
I created a folder for my images, so it would look something like this,

I would write it as images/Untapped 2.png in my code for it to display an image. This could be different depending on the folder name and the image name, but it should look something like this,
<!DOCTYPE html>
<html>
    <head>
        <title>Tile of the Page</title>
    </head>
    <body>
        <img src="images/Untapped 1.png" alt="for description">
        <img src="images/Untapped 2.png" alt="for description">
        <img src="images/Untapped 3.png" alt="for description">
    </body>
</html>
Height & Width
You can also add two other attributes that will specify its size:
height: height of the image in pixels
width: width of the image in pixels
<!DOCTYPE html>
<html>
    <head>
        <title>Tile of the Page</title>
    </head>
    <body>
        <img src="images/Untapped 1.png" alt="for description" height="600" width="500">
        <img src="images/Untapped 2.png" alt="for description" height="600" width="500">
        <img src="images/Untapped 3.png" alt="for description" height="600" width="500">
    </body>
</html>
Where to place images
Where you place an image will affect how it is displayed. Here are some examples,
Before a paragraph: The paragraph starts after the image.
        <img src="images/Untapped 1.png" alt="for description" height="600" width="500">
        <p>Something something something</p>
Inside the start of a paragraph: The first row of text will align with the bottom of the image.
<p><img src="images/Untapped 1.png" alt="for description" height="600" width="500"> Something something something</p>In the middle of a paragraph: An image is placed between the word of a paragraph.
<p>There are a billion things to do in this word<img src="images/Untapped 1.png" alt="for description" height="600" width="500"> Something something something</p>Rules for Creating Images
Save images in the correct format: Websites mostly use images in jpeg, gif, or png format. If you choose the wrong format then the image may look blurry and can make the website slower.
Save images in the correct size: You should save images in the correct height and width it will appear on the website.
Measure image in pixels: You should measure the image height and width in pixels.
Figure and Figure Caption
<figure>
Images will often come with captions. The <figure> element will contain the image and its caption. You can have more than one image inside <figure>, but it has to share the same caption.
<figcaption>
This would allow us to add captions to an image.
<!DOCTYPE html>
<html>
    <head>
        <title>Tile of the Page</title>
    </head>
    <body>
        <figure>
            <img src="images/Screenshot (740).png" alt="for description">
            <br>
            <figcaption>An image that has been made to fit in this web page</figcaption>
        </figure>
</html>
Tables
A table represents information in a grid format such as financial reports.
Table Structure
<table>
This is used to create a table.
<tr>
You indicate the start of each row by using <tr>.
<td>
Each cell of a table is represented using <td>.
<!DOCTYPE html>
<html>
    <head>
        <title>Tile of the Page</title>
    </head>
    <body>
        <table>
            <tr>
                <td>1</td>
                <td>2</td>
                <td>3</td>
            </tr>
            <tr>
                <td>4</td>
                <td>5</td>
                <td>6</td>
            </tr>
            <tr>
                <td>7</td>
                <td>8</td>
                <td>9</td>
            </tr>
        </table>
</html>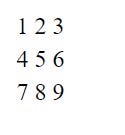
Table Heading
<th>
This is used to represent the heading for either a column or a row. You don’t have to use scope=”col” or scope=”row” for it to work, but it is a good idea to indicate it as a col or row since it can make it easier to understand what the code does.v
<!DOCTYPE html>
<html>
    <head>
        <title>Tile of the Page</title>
    </head>
    <body>
        <table>
            <tr>
                <th></th>
                <th scope="col">Mon</th>
                <th scope="col">Tue</th>
            </tr>
            <tr>
                <th scope="row">Revenue</th>
                <td>$86</td>
                <td>$928</td>
            </tr>
            <tr>
                <th scope="row">Cost</th>
                <td>$29</td>
                <td>$62</td>
            </tr>
        </table>
</html>Spanning columns
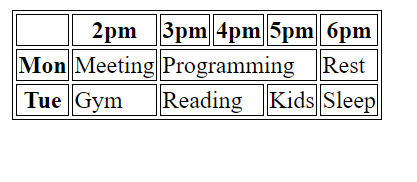
Sometimes you may need entries to stretch out across more than one column.
We would use colspan attribute to indicate how many columns the cell will run across. The value of the colspan attribute should indicate how many columns the cell will run.
<!DOCTYPE html>
<html>
    <head>
        <title>Tile of the Page</title>
        <link rel="stylesheet" href="style.css">
    </head>
    <body>
        <table>
            <tr>
                <th></th>
                <th scope="col">2pm</th>
                <th scope="col">3pm</th>
                <th scope="col">4pm</th>
                <th scope="col">5pm</th>
                <th scope="col">6pm</th>
            </tr>
            <tr>
                <th scope="row">Mon</th>
                <td>Meeting</td>
                <td colspan="3">Programming</td>
                <td>Rest</td>
            </tr>
            <tr>
                <th scope="row">Tue</th>
                <td>Gym</td>
                <td colspan="2">Reading</td>
                <td>Kids</td>
                <td>Sleep</td>
            </tr>
        </table>
</html>
In the example, I have stretched out programming to take up three columns (3 pm-5 pm) and reading to take up two columns (3 pm-4 pm) (PS: I have also used CSS to make it easier to see).
Spanning Rows
You can also use rowspan attribute to indicate how many rows a cell should span. It operates the same as colspan.
<!DOCTYPE html>
<html>
    <head>
        <title>Tile of the Page</title>
        <link rel="stylesheet" href="style.css">
    </head>
    <body>
        <table>
            <tr>
                <th></th>
                <th scope="col">Mon</th>
                <th scope="col">Tue</th>
                <th scope="col">Wed</th>
            </tr>
            <tr>
                <th scope="row">1pm-2pm</th>
                <td rowspan="2">Meeting</td>
                <td>Programming</td>
                <td>Rest</td>
            </tr>
            <tr>
                <th scope="row">3pm-4pm</th>
                <td>Reading</td>
                <td>Kids</td>
            </tr>
        </table>
</html>
Long Tables
These elements are mostly used to help people who use screen readers, organize the code, and allow you to style these sections in a different format,color in CSS.
<thead>
The heading should be inside the <thead>
            <thead>
                <tr>
                    <th scope="col">Date</th>
                    <th scope="col">Name</th>
                    <th scope="col">Revenue</th>
                </tr>
            </thead>
<tbody>
The body should be inside the <body>
            <tbody>
                <tr>
                    <th>March 1</th>
                    <td>Chris</td>
                    <td>$948</td>
                </tr>
                <tr>
                    <th>March 1</th>
                    <td>Joseph</td>
                    <td>$456</td>
                </tr>
                <tr>
                    <th>March 1</th>
                    <td>David</td>
                    <td>$840</td>
                </tr>

                <tr>
                    <th>March 1</th>
                    <td>Aeron</td>
                    <td>$264</td>
                </tr>
            </tbody>
<tfoot>
The footer should be inside the <tfoot>
            <tfoot>
                <tr>
                    <td></td>
                    <td></td>
                    <td>$2508</td>
                </tr>
            </tfoot>
If you put all of these together,
<!DOCTYPE html>
<html>
    <head>
        <title>Tile of the Page</title>
        <link rel="stylesheet" href="style.css">
    </head>
    <body>
        <table>
            <thead>
                <tr>
                    <th scope="col">Date</th>
                    <th scope="col">Name</th>
                    <th scope="col">Revenue</th>
                </tr>
            </thead>
            <tbody>
                <tr>
                    <th>March 1</th>
                    <td>Chris</td>
                    <td>$948</td>
                </tr>
                <tr>
                    <th>March 1</th>
                    <td>Joseph</td>
                    <td>$456</td>
                </tr>
                <tr>
                    <th>March 1</th>
                    <td>David</td>
                    <td>$840</td>
                </tr>

                <tr>
                    <th>March 1</th>
                    <td>Aeron</td>
                    <td>$264</td>
                </tr>
            </tbody>
            <tfoot>
                <tr>
                    <td></td>
                    <td></td>
                    <td>$2508</td>
                </tr>
            </tfoot>
        </table>
</html>
Forms
Forms will contain spaces for your users to fill in the information. For example, the search box on Google’s homepage is a form.
There are several types of forms that you can use to collect information:
Text input: Used for a single line of text such as name or email addresses
Password input: Similar to text input, but it masks the characters you would enter
Text area: For longer text such as comments or messages
Radio buttons: Used when a user must select one of many options
Checkboxes: Used when a user can select and unselect one or more options
Drop-down boxes: Used when a user picks one of a number of options from a list
Submit buttons: Submitting data from your form to another web page
Image buttons: Similar to submit but they allow you to use an image
File upload: Allow user to upload files
Forms work by a user filling in information and then pressing a button that will submit their information to the server.
Form Structure
<form>
Form controls live inside <form>.
action
<form> will require an action attribute. The value is the URL for the page on the server that will receive information in the form when a user submits it.
method
Forms can be sent using one of two methods: post or get.
When using the post method, the value is sent as HTTP headers. You should use post when:
users upload a file
is very long
contains sensitive data (password)
adds information to, or deletes information from, a database
When using the get method, the values from the form are added to the end of the URL specified in the action attribute. You should use get when:
short forms (search boxes)
when retrieving data from a web server
Text input
<input>
This is used to create different kinds of form controls. The value of type determines what kind of input you want to create.
type=”text”
This creates a single-line text input.
name
This is for when the server needs to know which form control each piece of data was entered into. For example, servers need to know what has been entered as a username and what has been given as the password. The value of this attribute identifies form control and is sent along with the information users enter into the server.
maxlength
You can use this to limit the number of characters a user may enter into the text box.
<!DOCTYPE html>
<html>
    <head>
        <title>Tile of the Page</title>
        <link rel="stylesheet" href="style.css">
    </head>
    <body>
        <form action="" method="">
            <p>Name:
            <input type="text" name="name" maxlength="6">
            </p>
        </form>
    </body>
</html>
Password Input
<input>
type=”password”
This will create a text box similar to “text”, but the characters are blacked out.
<!DOCTYPE html>
<html>
    <head>
        <title>Tile of the Page</title>
        <link rel="stylesheet" href="style.css">
    </head>
    <body>
        <form action="" method="">
            <p>Name:
            <input type="text" name="name" maxlength="6">
            </p>


            <p>Password:
                <input type="password" name="password" maxlength="25">
            </p>


        </form>
    </body>
</html>
Text Area
<textarea>
This is used to create multi-line text input. Any text that is between <textarea> and closing </textarea> will appear in the text box.
<!DOCTYPE html>
<html>
    <head>
        <title>Tile of the Page</title>
        <link rel="stylesheet" href="style.css">
    </head>
    <body>
        <form action="" method="">
            <p>Who are you?</p>
            <textarea name="comments" id="" cols="30" rows="10">Enter your answer</textarea>
        </form>
    </body>
</html>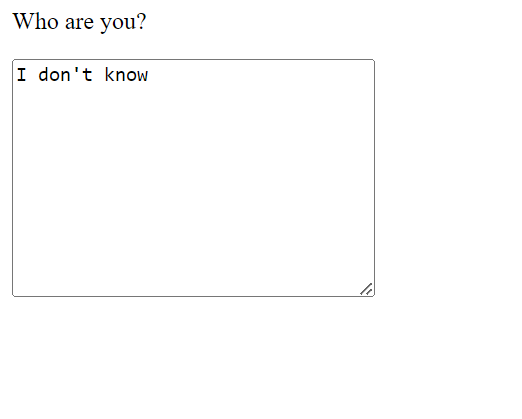
Radio Button
<input>
type=”radio”
This will allow users to pick one of a number of options.
value
This indicates the value sent to the server for the selected option. The value of each button should be different.
checked
This is used to indicate which value should be selected when the page loads. Only one radio button should use this attribute.
<!DOCTYPE html>
<html>
    <head>
        <title>Tile of the Page</title>
        <link rel="stylesheet" href="style.css">
    </head>
    <body>
        <form action="" method="">
            <p>Select your favorite pet:
                <input type="radio" name="pet" value="dog" checked=""checked"> Dog
                <input type="radio" name="pet" value="cat"> Cat
                <input type="radio" name="pet" value="fish"> Fish
            </p>
        </form>
    </body>
</html>
Checkbox
<input>
type=”checkbox”
This allows users to select (and deselect) one or more options.
<!DOCTYPE html>
<html>
    <head>
        <title>Tile of the Page</title>
        <link rel="stylesheet" href="style.css">
    </head>
    <body>
        <form action="" method="">
            <p>Select your favorite pet:
                <input type="checkbox" name="pet" value="dog" checked=""checked"> Dog
                <input type="checkbox" name="pet" value="cat"> Cat
                <input type="checkbox" name="pet" value="fish"> Fish
            </p>
        </form>
    </body>
</html>
Drop Down List
<select>
This will allow users to select one option from a drop-down list. The <select> contains two or more <option> elements.
<option>
This is used to specify the options a user can select from. The words between <option> and closing </option> will be shown to the user
<!DOCTYPE html>
<html>
    <head>
        <title>Tile of the Page</title>
        <link rel="stylesheet" href="style.css">
    </head>
    <body>
        <form action="" method="">
            <p>Select your favorite programming language: </p>
            <select name="languages" id="">
                <option value="python">Python</option>
                <option value="java">Java</option>
                <option value="c++">C++</option>
            </select>
        </form>
    </body>
</html>
Multiple Select Box
<select>
size
The value should be the number of options you want to show to the user at once.
multiple
You can use multiple attributes to allow users to select multiple options.
<!DOCTYPE html>
<html>
    <head>
        <title>Tile of the Page</title>
        <link rel="stylesheet" href="style.css">
    </head>
    <body>
        <form action="" method="">
            <p>Select one or more of your favorite programming language: </p>
            <select name="languages" size="2" multiple="multiple">
                <option value="python">Python</option>
                <option value="java">Java</option>
                <option value="c++">C++</option>
            </select>
        </form>
    </body>
</html>
[End of Part Two]